Holy swiss cheese! We finally got the wood out!!
Curious...? check it out! \/ \/
Now, I promised a 'before and after', right? This is sweet... check this out
Not only did we get that nasty smelling wood out, we also removed those strange, super-plastic matts on the ground. They were covered in sand and some strange material that absorbed water and turned to what looked like ice. It wasn't ice...
How it was done
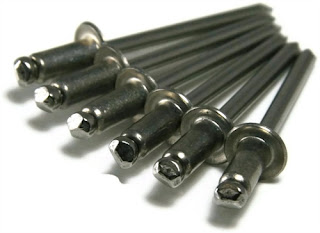
This was very labor intensive, although it shouldn't have been. The reason for this is because the wood was attached to those metal looking studs with what looked like rivets.
The photo on the bottom is what a rivet looks like before it's installed, the photo on the top is what they look like installed in metal. One drills a hole in the material, then sticks the long end of the rivet through the hole, and with a gun looking tool, squeeze the trigger and the metal is smooshed together and creates the photo on the bottom.
The problem with these comes when one tries to remove them. If it was a couple of rivets, no big deal. But there were probably around 50 in the entire trailer, whew! And there is no easy way to remove them. I have to drill some, and use a grinder and others. I'm glad to be done with it.
ANYWAYS, I removed the rivets, one by one, then the wood just popped off. We're gonna recycle the wood, either using it as a skirt for the trailer (to hide the landing gear), or as part of the porch. We might burn some, we might not. Who knows. All we know is we won't throw it away. If anything, it'll go in the compost.
What next??
As you can probably tell, the original floor of the trailer is made of wood (more nasty wood), so we'll have to remove that, then we'll have the metal frame. Without the wood floor, the 'floor' will be just the thick, metal framing that runs from left to right. There's about 20 of those metal structures there so we'll have enough support for the floor.
Before that though, we need to path all of the holes in the trailer (which is why this post is labeled "Holy swiss cheese!!'); there are a lot of them. We will need some kind of metal, waterproof sealant to cover up all of the holes. After that, we'll fix the roof (you can't see it from the photos but the far end of the trailer's roof is bent in a bit).
When we are done with the roof, we'll remove the wood floor, install a sub floor, and begin cutting the trailer for the windows and door. Of course, we will know where the windows and door will be so we won't path up holes, if there are any, in those places.
How will we remove the floor? Good question! I have no idea. It looks simple, but who really knows. The individual plans may be screwed on to something, they might not be. Either case, I'll find out either tomorrow or next week.
Timeline?
I reviewed our timeline and we are actually ahead of schedule (which never happens in construction I hear). At this rate, figuring many mistakes along the way, we should finish the whole thing by the first week of June. This is exciting because we thought we'd finish by the end of June!
Stay tuned! And thanks for reading :)


No comments:
Post a Comment