Wednesday, December 23, 2015

Burn, baby, burn!!


The fireplace has arrived! It's a lot more sturdy and heavy than we originally thought, which is a good thing! This bad boy is rated for 40' trailers/boats, we have just 25', so it should be more than enough.

We are happy it's finally arrived and we'll be doing a test burn here soon. When one gets a new fireplace, it's always a good idea to let it burn a couple of logs before installing it. The fireplace can/will come with excess oil and whatnot so you don't want that fuming into the home.


Up next?? Coat the roof!! Those materials have also arrived (although not so exciting)...


The top container is a heavy duty sealant that will cover/seal the small holes after we put chalk in them. We were advised multiple times to do it this way, so we are trusting the experts!

The bottom container is a rubber, metal roof sealant that will prevent it from rusting, cracking, breaking, etc.

We'll have to estimate where the fireplace flue will exit the roof, not coat that area, and coat the rest of it. After we do that, we'll be able to move on to slowly and professionally building the framing of the house! After that it's wiring, slight plumbing, then the loft frame. Finally, we'll install the installation and dry wall and be nearly finished. 

Thanks for following along our blog, your support helps us keep going with tenacity!!!

Monday, December 14, 2015

What's next? The roof

Hello everyone!

After a relaxing weekend mixed with work and vacation, we're ready to get back at it. Kiah and I sat together this morning pondering of the next steps to take in this tiny home adventure.

What we figured would be best to do next is prepare the roof for long term weather conditions. At it's current condition, it's not bad, although it's not exactly good either. We have high standards (or at least we try to).

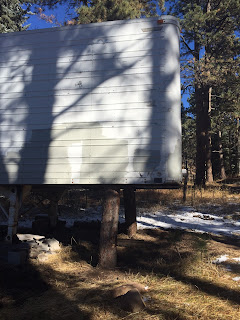
This is what the roof looks like as of now (not the best pictures, I know)...


You can tell the roof already has a sort of white coating on it. I'm not exactly sure what this is, but I can tell you it is for long term weather conditions, but it doesn't hold up to our standards. There are also a few holes in it from when the snow (I think) built up and pushed down on it.


The other day (while Kiah was cleaning the inside of the trailer) I got on top of the roof and sealed the holes. What I plan to do next is permanently seal the holes with a low cost white roof sealant.


The best sealant that we found (for the right price) was Henry's Silicone Seam and Repair Roof Sealant (we don't receive benefits or support from Henry to use them).


We're confident that after we seal the tiny holes with this, then coat the roof twice with Henry's Silicone Roof coating, the roof will be ready to cut and lift! 


What now

What we have planned for now is;

1. Seal the roof, coat it
2. Buy the 6 windows we need for the home
3. Rip out the nasty floor
4. Prepare the sub-floor (but not actually install the wood floor)
5. Begin building the 1st floor frame
6. Cut the roof
7. Place the roof
8. Finish building the loft frame
9. Build the wall on the exposed side of the trailer
10. Place wires where needed
11. Cut the trailer for the windows and door to be placed
12. Place windows and door
13. Put up fireplace!
14. Insulate the beast


As you can see, we have a lot yet to be done. But in my eyes, the hard work is over. Now, we focus on precision and timing. All of the heavy lifting (I hope) is over.

I do talk to contractors and construction workers to get their opinions on the foundation of the home and many think it's good for now. Some express concerns of the tree trunks rotting.


While I do think this is a possibility, I don't think it'll happen anytime soon (within the next 5 years).

Some express concern with the foundation being dependent on the trailer's rear axle due to the shocks; they say it'll bounce. I've asked if the bouncing is a problem and they say no. As long as we can bear it :)

We may make some modifications to the foundation as we go along, but for now it seems sufficient.
   

Saturday, December 5, 2015

Holy swiss cheese!!!

Holy swiss cheese! We finally got the wood out!!
Curious...? check it out! \/ \/

Now, I promised a 'before and after', right? This is sweet... check this out


Not only did we get that nasty smelling wood out, we also removed those strange, super-plastic matts on the ground. They were covered in sand and some strange material that absorbed water and turned to what looked like ice. It wasn't ice...


How it was done

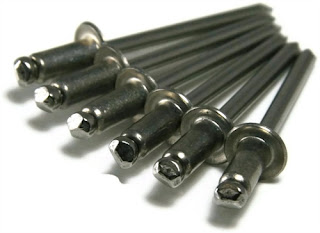
This was very labor intensive, although it shouldn't have been. The reason for this is because the wood was attached to those metal looking studs with what looked like rivets.


The photo on the bottom is what a rivet looks like before it's installed, the photo on the top is what they look like installed in metal. One drills a hole in the material, then sticks the long end of the rivet through the hole, and with a gun looking tool, squeeze the trigger and the metal is smooshed together and creates the photo on the bottom.

The problem with these comes when one tries to remove them. If it was a couple of rivets, no big deal. But there were probably around 50 in the entire trailer, whew! And there is no easy way to remove them. I have to drill some, and use a grinder and others. I'm glad to be done with it.

ANYWAYS, I removed the rivets, one by one, then the wood just popped off. We're gonna recycle the wood, either using it as a skirt for the trailer (to hide the landing gear), or as part of the porch. We might burn some, we might not. Who knows. All we know is we won't throw it away. If anything, it'll go in the compost.


What next??

As you can probably tell, the original floor of the trailer is made of wood (more nasty wood), so we'll have to remove that, then we'll have the metal frame. Without the wood floor, the 'floor' will be just the thick, metal framing that runs from left to right. There's about 20 of those metal structures there so we'll have enough support for the floor.

Before that though, we need to path all of the holes in the trailer (which is why this post is labeled "Holy swiss cheese!!'); there are a lot of them. We will need some kind of metal, waterproof sealant to cover up all of the holes. After that, we'll fix the roof (you can't see it from the photos but the far end of the trailer's roof is bent in a bit).

When we are done with the roof, we'll remove the wood floor, install a sub floor, and begin cutting the trailer for the windows and door. Of course, we will know where the windows and door will be so we won't path up holes, if there are any, in those places.

How will we remove the floor? Good question! I have no idea. It looks simple, but who really knows. The individual plans may be screwed on to something, they might not be. Either case, I'll find out either tomorrow or next week.


Timeline?

I reviewed our timeline and we are actually ahead of schedule (which never happens in construction I hear). At this rate, figuring many mistakes along the way, we should finish the whole thing by the first week of June. This is exciting because we thought we'd finish by the end of June!


Stay tuned! And thanks for reading :)

Wednesday, December 2, 2015

Collecting materials, help us out!

Colorado winter


Now that we're in winter it's time to shift some focus away from manual labor on the actual trailer to collecting materials needed for the tiny house.

Fortunately, when I was browsing the web this morning I came across a sweet website/blog that I'll link here.
This website has been a blessing in disguise! They've revamped my motivation to find recycled material. There is a young man on there that actually built a good looking tiny house for $8,000! That's $2,000 less than us! WOW! They did it by doing all of the labor themselves for for free from other people, getting recycled material whenever they could, and being smart about their build. Sounds possible to me :)


Some materials we'll try getting recycled;

-2x4's (a bunch of those)
-plywood
-insulation
-wood flooring (any color, a total of 210 sq. ft.)
-electrical wiring
-outlet plugs (5)
-light switches (3)
-dry wall (gypsum)
-windows (6)
-door

If you have any of these materials and you aren't using them or you know someone who does, please, let us know! We'll take it!!

Saturday, November 28, 2015

Why you no post long time?!?

Hey everyone!

Sorry for the lack of posting, winter has kind of stalled our project (like we expected).

For those of you looking for an update, we just bought our fire place, and it's the Cubic Mini Wood stove we talked about getting.  This bugger is small but packs a punch (say the people who bought it). It's capable of heating an RV, boat, etc. up to 40 feet long. Yep, that's 40 large ones! Our humble abode is just 25 feet long, I think we'll be ok. Especially with the type of insulation we are planning to install in the ceiling. 
It even has the metal shielding like the one photographed here :) It should arrive within 3-4 weeks, and when it does, we'll test it out and be sure to make a video of our review. For those of you interested in reading more about this stove (or seeing the reviews I mentioned), check out the link here.

One thing I wanted to mention about our experience so far with the fire place and the company we bought it from is that we attempted to contact the sellers twice within a week and a half time period and didn't hear anything from them. Once we get the product, we'll send an official review letting them know of this initial frustration. 

I (Travis) am the kind of person who likes to get a sense of a company before buying from them (if possible). The reason I didn't wait until they responded is because they had a black Friday deal on the fireplace for 30% off. Anybody who knows me knows I'm a sucker for deals, Kiah knows this all too well. You say "free food" and I'll coming runnin'!


The wood on the inside hasn't gotten completed removed yet (due to cold weather and a lack of knowing how exactly to remove it in the most efficient way. Once we have that removed, we'll move on to cutting the window and ceiling, building the interior wood framing, then putting up the insulation and floors.

Once we have all of that done we could (if we wanted) actually sleep in it! We'd have heating, insulation, and walls! Exciting stuff :) Stay tuned!!

Friday, November 13, 2015

Budget plan (so far)

What a productive week!

This week has been crazy both for Kiah and I, in both our work places and working on the tiny house. I'm glad the weekend is here to get some serious work done.


We are still working on the wood on the inside of the trailer. We got the shelving off, now we just need to get that nasty old wood that is nailed to the metal of the trailer.  Photos will be provided.

Good news is we have enough wood from the shelves to build a ramp to get in and out of the trailer while we build it as well as some heat shielding for the fire-place; did we say we were gonna get a fire-place?!?

One I've had my eye on for quite some time now:


I think it's absolutely perfect for our tiny home. There are specific regulations that everyone should adhere to when installing a fire-place. I hate regulations, but these are one of the few I'll follow to a T.


This is called the Cubic Mini Wood Stove. It's only about $400!! It'll heat RV's up to 40' long, which is much longer than our tiny home :)


Anyways... I finally got to a rough budget plan (several weeks a little late). As you all know, we are shooting for $10,000 maximum. This means we need to save as much money as possible in as many areas as possible. I'm all for saving money in every little nail, but with the rough estimates I've made thus far, the big purchases add up way more than the small ones.


Here is our rough budget plan:
Wood studs: @2.39 a piece (I'm sure we can find cheaper)= $263

Insulation: 
Option 1) with an R value at 13 (higher is better, our region should be 13-26 for walls): $153.45
Option 2) with an R value at 15: $149
Option 3) with an R value at 26 (if we double up on them): $688.48

Ceiling insulation: with an R value at 38: $70

Floor insulation: with an R value at 13: $26.48

Dry wall: $230.58 (we might be able to find cheaper)

Fire place: $400

TOTAL: $1,649. This means if we get anywhere under that number ^^ we'll be doing alright. If we spend about this much, we'll have about $6,896 left to spend on things like solar panels, a fridge, doors, windows, wood flooring, etc.

Sunday, November 8, 2015

Up next...? Nasty old wood... yay!

What's next?

Kiah and I are super excited that we got the foundation finished and are now moving to the interior of the trailer! Yay!!

If you haven't already seen it, check out our earlier posts on the foundation, pretty intense stuff. It took forever. Bleh. I'm glad to be done with it :)


Next we have the inside of the trailer, which looks like this;

We will be posting a before and after series of the inside with and without the wood. The wood covers all of the metal that makes up the shell of the trailer, it's gotta go. It smells funny, it's rotting... we aren't keeping most of it. Although it may seem like a burden, buying the trailer with this wood in it has it's PROS and CONS....

Pros:
-extra wood for other stuff, like; building a ramp, construction of the porch and loft, etc.
-we could use it for firewood

Cons:
-it smells funny
-theres a lot of dust and sand everywhere, when we remove it the dust gets into the air
-there's a lot of it covering most of the inside of the trailer
-most of it is old and not usable for anything structural


We'll see what we can think of once we remove the wood, but for now, we're gonna get that old, nasty stuff out of here! Be sure to check back for a before-and-after comparison!

Saturday, November 7, 2015

Foundation finished!


Hello again all :)


I'm happy to say that Kiah and I have officially finished with the trailer's foundation!! We will be making a small addition to it much later but for now, the photos below depict the primary and secondary foundation support systems.


<< This is the front of the trailer with the two trunks holding it up. The trailer stands up on it's own (without these trunks), but the trunks add obvious support for the front of the trailer. The sit right under the main part of the frame.

The photo below is just a wider view of the front of the trailer.


^^ These next two photos are of the back of the trailer, with two smaller trunks holding up the axle and the main weight of the entire trailer. 

You can't see with these photos, but the tries closest to the camera are off the ground whereas the ones further away are not. The reason for this is because of the slant in the ground. The two trunks under the axle are of different height but the difference wasn't enough to get both sets of tires off the ground.

I'm actually more comfortable with this set-up, rather than having both sets of tires off the ground. This adds some stability but also ensures us that if the tires end up deflating somehow, the entire tire won't become unleveled again.

We'll eventually have to get under the trailer and WD-40 everything to get it read for winter, but this is what we have so far! Thanks for reading :)


Saturday, October 31, 2015

Leveling the trailer!

Hello again everyone!

Kiah and I have been working our weekends hard to finally get the trailer of our tiny house leveled, it took a lot of work!

I would say for those of you attempting to build a tiny house yourself, prepare yourself to spend a good 4 days leveling it. With our level of expertise and equipment, it took longer than what many with experience may find.

Anyways, you all know that we are trying to keep the house under $10K so we decided to recycle fallen trees for some additional support. Personally, I'd rather have the support be overkill rather than under. 


We have the landing gear, two tree trunks that I cut with my step dad and placed into 2.5 foot holes, and the axle with the 4 tires. We will also be building a small deck/porch which will add support to the whole thing. The video below isn't too exciting, nonetheless, it shows some of the work involved with leveling a big trailer like this one.


**A side note on equipment, we've been able to borrow most of the equipment that we've used so far from friends and family. We haven't broken any of them (thank god) and plan to return all of the tools once we are done. Kiah and I have a strict policy that if we break any of the tools we will replace them right away with a new one. What we have bought is the 30K jack, which I priced on an earlier post.

Saturday, October 24, 2015

First Design Ideas

Hello Fellow Tiny House Lovers!


Today we're posting something a little bit different than our previous posts.  This post will be about design. The reason being, we're still in the process of leveling the trailer.  I want to share with you guys some ideas of what I want our tiny house to look like, mainly on the inside.  
The first design aspect that Travis and I have agreed on is that for our floor we want a light colored wood and then with dark stained or cherry wood accents. There's a lot of images on Google and this is the best one I found.  


Most of the pictures I've seen there's an equal amount of light colored wood and dark colored wood.  But I prefer to have more of the light colored wood than dark.  The reason being is because I want to keep our space as bright as possible but still be able to add some color or dimension to our house.

Next we also what to do a similar affect to the ceiling.  Here's a picture of what we want exactly.


The picture shown above, is actually the house that I draw a lot of inspiration from.  Here's the link to see the full house. 
http://tinyhouseblog.com/stick-built/university/

If you check out this house.  I love the stairs and the placement of the refrigerator.  I also love the wood ceiling in the bathroom and kitchen.  I also love the table/booth and the big window next to it.  We've designed our tiny house to have this table/booth and big window.  Check out our previous post of our "blue print" and you'll see where we placed everything.

Now for our clothes, I first had the idea of having a little side door next to our bed in the loft floor.  I then realized that I didn't want to grab my clothes from the loft and bring them down stairs to change or change in the loft, which would be super cramped.  So I came up with the idea of having a his and her closet right next to the bathroom.  This way we can have our clothes down stairs and be able to get dressed in the bathroom, which we'll have more room than maybe changing up in the loft or carrying our clothes all around our house. I found a picture that gave me the idea for the closet. I do like the compartments in the picture below, but I have a slightly different image in my head.


I really like the drawers on the bottom that come out, for shoes.  But the middle section I want to be able to hang clothes, like dresses or Travis' fancy work clothes. But our closets will have doors on them.  At first I was thinking of curtains but I like the idea of having doors more because it looks more organized and cleaner.  

Second to last I want to mention my crazy love for copper/ rose gold accents.  I want cooper accents threw out the whole house. Especially in the kitchen.  Travis and I decided that we want a copper sink.  Our sink will obviously not be as big as the one in the picture below.  But I love the idea of the cutting board fitting over the sink, because that saves a lot of room and you can use the sink for multiple purposes. (That's why I chose this picture)  We've also decided not to have a bathroom sink.  Our kitchen sink will act as our bathroom sink.  This decision may obviously change when we get closer to assembling the inside of the house.


Lastly, the only vision I have for the kitchen right now is hanging my tea cups from the bottom of the cabinets or a shelf.  I love tea and tea cups and I have an assortment of them and I would love to be able to display them and it also have functionality.  I'm not sure if I want to screw hooks into the bottom of the cabinets or have a long copper rod with hooks.  But I'm sure that this decision/ design will be made when I'm actually ready to hang my tea cups ;)


So for right now,  these are our ideas on what we want.  Obviously these ideas and decisions may change but when I envision what the inside of our house will look like, these are the things that stick out the most to me. 

I also have a Pinterest that I've pinned some tiny house ideas that I love so here's the link to my Pinterest if you're interested: https://www.pinterest.com/happyhappys11/tiny-houses/ 

I'm not sure how or if any of these things will match and flow but like I've said before, I want this house to feel like a home.  And homes are not meant to be perfect.  They're meant to look like someone lives in it.  It gives off personality and character of the people that live in them. 

Side note, that's why I loved going trick or treating.  For a brief moment I got to see inside peoples homes and see a glimpse of their lives and what they may cherish and value the most.  I enjoy that a lot.  

Anyway, I love every idea that Travis and I have come up with so far.  We would love to do all of our ideas, but in the end we have to narrow it down.  

I hope that everyone enjoyed this post and I promise there will be more posts like this, even when we're building and constructing the main structure of the house. This last thought is mainly for myself but I know there will be times that I may get stressed and loose sight of what we're doing, but having posts like these, will help remind me and give me a purpose to see this crazy adventure to the end.  Til next time.....


HAPPY TINY HOUSE ADVENTURES!


Tuesday, October 13, 2015

The trailer is leveled!!! Just kidding... :(

Hello Everyone!

We have officially hit our first road-block.

While Kiah and I were lifting the trailer with our 30-ton jack (which worked fabulously), we put the cinder blocks underneath the axle and it all worked out fine until we began lifting the landing gear. The weight transferred to the axle and sliced through the cinder blocks like bread.

Now we are in thinking mode.


We need something that will hold the weight of the trailer (20Klbs.+), and the pressure of the 30-ton jack. The concrete blocks we bought were rated for about 2000lbs of psi, we need a lot more than that.


We've looked up material with high PSI and found that certain types of wood can hold much more PSI than the cinder blocks. We'll test that and see. 

So far, we've designed a way to test the material to see if it can hold the weight so it doesn't put either of us in danger.


If any of you have any legit recommendations, please let us know!

Sunday, October 11, 2015

Blue print finished


Blue Print has been finished

Hey everyone!

We are pleased to inform you all that our blue print has been finished!

We've decided to leave the right side of the trailer unfinished for the most part because we aren't sure what to do with that yet. Seems as though we have more space than we need ;)

Up next; level the dang thang.

Tuesday, October 6, 2015

Tiny House hacks.... good idea!

Hi again :)

I (Travis) was browsing the internet for some cool hacks or tips on how to maximize space in a tiny house and found a sweet website. It's obviously important to maximize space because we have very little of it! This is what I enjoy most about this challenge; how can you maximize the usage and appearance of every little thing in your home to make it the most comfortable. As opposed to; how can we fill a bunch of space we don't need.

Having tiny house hacks and lifestyles is perfect while living in a tiny house. But these can also be useful for people who find they aren't using their space efficiently.

Kiah and I (we) are lucky. Our trailer is much bigger than 'conventional' tiny houses. Nonetheless, it's still tiny and we need to be as efficient as possible. We've come up with some ideas on our own, such as a bed above the kitchen to conserve energy consumption for heat as well as maximizing space. But for other things we need community ideas.

Hello All!
Kiah here.... I think this is a wonderful idea. I would not of researched hacks on tiny house living on my own.  That's why I'm so lucky to be with a guy who thinks of these things :)
Also I wanted to mention, the reason why I haven't been posting much lately is because this whole leveling/foundation and construction part of the tiny house, is more of Travis's thing.  I will be posting more later about home decor/ designing.  When we post our "blue print" for the tiny house, I will definitely talk about my ideas and why I wanted to design everything the way I did.

Anyway, let's get on with the tiny house hacks!


I (Travis) found out about 31 hacks from a cool website; http://www.buzzfeed.com/morganshanahan/tiny-house-hacks-to-maximize-your-space#.cupdP7j3y.

I'll list some of the ones I thought were worth mentioning here;

1. Keep your window to wall ratio high.
-This is extremely important. Having a high window to wall ratio creates an illusion that you have more space than you actually do. Mirrors have the same effect. We will definitely have a lot of mirrors around our tiny house. I also love the idea of lot's of windows, because 1) to let in as much natural light as possible which adds to the illusion part, 2) to keep the tiny house cool in the summer, we can just open all the windows.  There won't be any reason to have a fan that wastes energy.

2. Create outdoor living space to add the feeling of square footage without the cost.
-This is just like the last piece of advice, create the illusion of space. This is practically the same as having the space... except, of course, in our case, we don't actually have that space.
This is funny because the other day I was telling Travis about my idea for what I would like to do out side the tiny house.  Because when we have people over, or like our house warming party, the outside space is just as important as the inside, because we want people to feel comfortable and not feel like we all have to stay cramped in the tiny house to have a party :)

3. Opt for fewer walls, more multipurpose rooms.
-This is a must. I'm not sure anyone could have a tiny house and not use rooms in more than one way. In our case, we plan on using the living room as both that and the dining room. The kitchen will be right next to the bathroom (but far away from the toilet, we don't like poop in our food).

4. Add a loft over your kitchen.
-As we mentioned before, we'll definitely be doing this. The reason is two fold, but the impact is phenomenal; 1.) Uses up some extra space. The tallest person in this house will be me, and I am an astounding 5'7", watch out Shaq! This means our bottom floor can reach up to 6' comfortably for us both. 2.) Having the loft above the kitchen helps us conserve heat.

The calculation of how much heat you'll need is a slightly complex equation. You have to literally figure out how much heat everything in your space gives off, even if it seems negligible. The reason for this is because if you, for example, need your space to be 60 degrees before you can be comfortable, everything that helps the temperature in the room rise is worth counting.

5. Utilize space under stairs.
-Duh. Just... duh.
Ya gotta use all available space for SOMETHING. Most design features will also be functional. That's a must for a tiny house!
Yes! most definitely! I want to design something where the table and chairs get tucked away and hidden.  Or have the stairs for book shelves, Travis and I have a lot of books :) Or just for design purposes and adding pictures, make it feel like a home.

6. Put a shelf on it.
-Yes yes and yes. For the same reason above. If there's room, use it!!

7. Create the illusion of vertical space by having low sitting furniture.
- I love the idea, not sure I'd like it in practice. Perhaps you would...?
Not sure the lady would like it either ;) You always gotta run it by the lady. If you don't have the lady's approval before doing something, might as well say goodbye now.
Oh you're so sweet! And right, if the lady doesn't like it then, you have to say goodbye. There's no winning if the lady doesn't like it ;) But I'll have to see some pictures and maybe try it out myself. I'll definitely keep this hack in mind for the living room.

8. Utilize retractable pantry drawers for small appliances.
- I think this is genius. The retractable idea is just absolutely creativity. We want to apply this to the dining room table, I think it'd be great to have a table and chairs that fold in and out when needed to add more walking space when we aren't eating. I think this could also apply to the guest bed. Having a multipurpose couch that turns into a twin size bed would be perfect. Or even a bathroom mirror that works as a mirror (obviously), a small bathroom closet, as well as a medicine cabinet. This is the kind of stuff I'm interested in.
Yes the bathroom mirror is a must for doubling as a medicine cabinet! Travis and I have talked about it, and I don't want anything to sit of the counters.  I want things to be tucked away and organized.  This helps for multiple reasons; helps me stay organized, makes it look decluttered= the illusion of more space, and lastly not having things sitting everywhere helps keeping your space that much cleaner! And let me tell you all, I LOVE to have my space clean and organized :)


That's pretty much all the stuff I was interested in. Hopefully you all liked it as well. There's a lot of resources out there, more importantly; a lot of people out there willing to help.

This is one of the bigger reasons we are building this tiny home; to connect and send the world a message. Yes, we want something to live in. But more importantly, we want to show the world that it can be done. We don't need 3,000sq ft. to live in and we most definitely can have a synergetic relationship with the Earth without being hippies. Hear Hear!

I also want to mention... I wanted to add this in an earlier post, but decided to wait til another good blog opportunity came up, but I feel this post is as good as any.  I'm excited for every aspect of this tiny house adventure.  But the number one thing I'm most excited about, is making this feel like a home. Our home. This will be our space and I want to make it feel as comfortable for the both of us, as well as when we have guests. I feel like that's the most important thing to me right now.  I want to make this feel like a home for Travis. Also sometimes I feel some people don't understand why we're doing this.  They may think, "well just go buy a 'regular sized' house, that's a home" but they don't understand.  We're doing this for many reasons and one of them is to show people you can have a small house and make it feel and look just like a home.  Like Travis mentioned above, we don't need 3,000 sq ft to make it feel like a home. Lastly, Travis always tells me, it doesn't matter where the home is; it can be anywhere, what matters is where each others hearts are. That's where home is. 

Tuesday, September 29, 2015

Tiny Home foundation "issues"


Bad foundation ---->

Foundation is easy to screw up; mainly because it's difficult if you don't have any prior building experience! Whatever you do, don't build your foundation on these bad examples!


Good foundation -----> 


Hello again everyone!

At this moment, Kiah and I are attempting to level the trailer out and create a solid foundation for our tiny home.

We have 4 wheels in the back and two metal structures called the "landing gear". If we were to leave the trailer on it's wheels and the landing gear on the ground, we risk having the tires go flat (and therefore our trailer becoming UNleveled), the landing gear sinking into the ground, and just general tiny-house-chaos.

Oh, and BTW, the ground the trailer is on currently has an incline worth worrying about. Otherwise we would've dug the area and flattened it out before hand.

What we are planning on instead is:
1. Lift the back end of the trailer enough so the tires are off the ground
2. Remove tires
3. Get the landing gear on some kind of concrete
4. Support the middle of the trailer with some concrete
5. Level the entire thing.


Some issues we've run into with this (so far):
1. You can just use any jack stands to keep this baby off the ground. We have to assume the trailer is more than 1 ton unloaded and might be around 20-50 tons (we honestly have no idea what to expect). Better safe than sorry. With that kind of weight, you can't use; wood (if you use the wood with the grain going parallel with the ground, it'll bend and warp), cinder blocks (they are meant to hold a maximum of 2,000 psi (pounds per square inch), or dirt.

2. Paying for someone to come out all the way to Morrison and lay concrete slabs, THEN move them underneath the trailer is way too expensive.

3. The trailer needs to have solid foundation. We can't have it moving on us one day with us living in it.
4. How does one get the trailer off the ground in the first place?

Possible Solutions:
1. If we use enough concrete blocks in specific places, we may be able to disperse the weight so that it all isn't on the axles of the trailer and therefore will be able to get it off the ground and leveled.

2. We won't pay for that kind of service. It just isn't feasible.

3. We won't continue building until we have confidence in our foundation

4. We bought a 30-ton jack. Hopefully the trailer won't be more than that when we are done. If it is, we'll buy a heavier duty jack and send this one back.


This is the kind of concrete block we will be doing more research on -->

Fortunately for us (perhaps unfortunately for the next Tiny House builders), we have to learn the basics of engineering to calculate whether or not several of these grey beauties will hold up our frankenstein. Honestly, that just excites me :)


--October 3--

The jack has arrived! Again, it was about $95 and is a 30-ton jack, should be more than enough. 

Word to the wise; if you're gonna use a jack, make sure the ground you have the jack on is solid or the weight is dispersed with wood or something else. You don't want the jack going straight into the ground, it could sink! We'll put it on a couple of wood boards to disperse the weight.